
Next.js로 구현해 본 LinkTree
우리가 만들게 될 결과물은 아래와 같습니다.
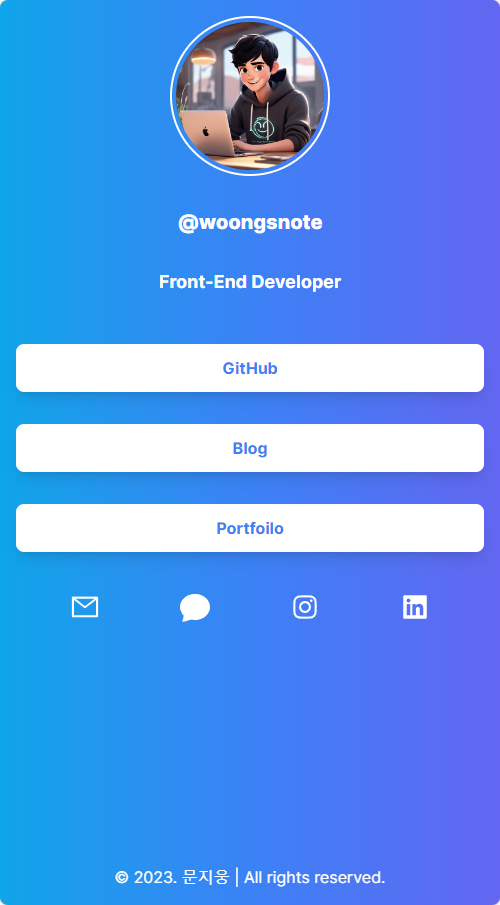
1. 프로젝트 준비 및 생성
준비물: 프로필 이미지- 프로필 이미지로 사용할 이미지 파일 또는 주소가 필요합니다.
Next.js를 베이스로 만들 예정이므로 아래 명령어로 프로젝트를 생성합니다.
npx create-next-app@latest## 2. 프로젝트 구현
이제 컴포넌트들을 구현하면 됩니다.
( ) 안의 내용은 제가 구현한 컴포넌트 이름들입니다. 😊
- 전체 컴포넌트들을 포함할 레이아웃 컴포넌트( ProfileCard.tsx )
- 프로필 이미지와 이름, 직업을 표시할 컴포넌트(UserInfo.tsx)
- 이미지 컴포넌트 (ProfileImage.tsx)
- 공유하려는 링크들을 표시할 컴포넌트(UserLinks.tsx)
- 각 링크에 대한 컴포넌트(LinkItem.tsx)
- 소셜 아이콘 모음 컴포넌트(SocialIcons.tsx)
- 각 아이콘에 대한 컴포넌트(LinkIcon.tsx)
import ProfileCard from "@/components/ProfileCard";

const USER_NAME: string = "woongsnote";

export default function Home() {

  return (
    <>
      <main className="flex h-screen flex-col items-center mx-auto text-white">
        <ProfileCard username={USER_NAME} />
      </main>
      <footer className="fixed bottom-0 w-full text-center pb-4 text-white px-2">
        <p> © 2023. 문지웅 | All rights reserved.</p>
      </footer>
    </>
  );
}
import SocialIcons from "./SocialIcons";
import UserInfo from "./UserInfo";
import UserLinks from "./UserLinks";

const ProfileCard = ({ username }: { username: string }) => {
  return (
    <div className="w-full space-y-8 max-w-lg px-4 items-center flex flex-col">
      <UserInfo username={username} />
      <UserLinks username={username} />
      <SocialIcons username={username} />
    </div>
  );
};

export default ProfileCard;
3. 프로젝트 배포
- 프로젝트에 불필요한 파일들을 제거하여, 프로젝트를 정리합니다.
- ex) vercel.svg, next.svg 등
- 이번 프로젝트의 경우, github가 제공해주는 github-pages를 활용해서 {username}.github.io 로 배포할 예정입니다.
- 배포를 위해 github actions을 적용할 예정입니다.
4. github actions 적용하기
프로젝트가 github에 업로드되고 나면, settings로 이동합니다.
Pages를 클릭하면, GitHub Pages를 확인하실 수 있습니다.
Source가 기본적으로, Branch로 설정하도록 되어 있을텐데, 이를 GitHub Actions로 변경합니다.
변경하게 되면, GitHub가 next.js 프로젝트임을 알고 해당 Actions을 추천해줍니다.
configure 버튼을 클릭해서 들어가면 yaml 파일을 확인할 수 있습니다.
여기서 한 가지 수정이 필요합니다.
현재 node의 LTS 버전은 18버전이므로, 16을 18로 수정해줍니다.
또한, next.config.js 파일을 아래와 같이 수정합니다.
/** @type {import('next').NextConfig} */

const nextConfig = {
  output: "export",
};

module.exports = nextConfig;
GitHub Pages는 기본적으로 jekyll 기반이므로, root 디렉토리에 .nojekyll 파일을 추가해줍니다.
수정한 next.config.js 파일과 .nojekyll 파일을 commit하고 push하면 정상적으로 동작할 것입니다.
완성한 프로젝트는 아래 링크에서 확인하실 수 있습니다.
긴 글 읽어주셔서 감사합니다. 😊
댓글
로그인 후 댓글을 남길 수 있습니다.
아직 댓글이 없습니다.